Insert molding is a key technology for combining metal and plastic parts. Compared to other processes, insert molding offers many advantages. It achieves a perfect combination of metal and plastic, providing products with the strength and durability of metal, as well as the lightness and flexibility of plastic.
So, what exactly is insert molding? How does it work? Keep reading as we answer these questions and provide more information about insert molding.
What is Insert Molding?
Insert molding, also known as insert injection molding, is a process where inserts are pre-positioned within the injection mold at specific locations before injecting the plastic material. After the plastic material is injected into the mold, the inserts are encapsulated and surrounded by the molten plastic. Upon cooling and solidification of the plastic, the inserts become tightly embedded within the plastic, resulting in finished products with features such as threads, electrodes, or other embedded components.

This process allows for the integration of various inserts, including metal, glass, wood, fibers, paper, rubber, or pre-formed plastic parts, into plastic components.The most common inserts are metal.
The applications of insert molding are extensive, allowing for the production of a variety of strong, durable, and lightweight plastic products. This technology is used in the manufacture of automotive parts, electronic device housings, household items, and sports equipment, among other things.
Steps for The Insert Molding Process
The insert molding process shares similarities with traditional injection molding, as both involve melting plastic and injecting it into a mold to form a part. However, the unique aspect of the insert molding process lies in the precise placement of pre-manufactured inserts into the mold cavity before the plastic is melted and injected.

Step 1: Placing the Inserts into the Mold
In the design of molds for insert molding, accurately placing the inserts into the mold is a crucial step. Engineers pay special attention to the positioning of the inserts within the mold during the design process, as this step directly determines the stability and final quality of the product during molding.
There are two main strategies for placing inserts into the mold: automated insertion and manual insertion.
Automated Insertion
This strategy utilizes advanced automation technology, employing robots or specific mechanisms that can withstand high temperatures to accurately place the inserts into the mold. Automated insertion ensures efficient, precise, and consistent placement of the inserts. Since automated machines can work continuously and stably in high-temperature environments, they can quickly complete large-scale production tasks, achieving rapid turnaround.
Insertion by Hand
In contrast to automated insertion, insertion by hand relies on operators to manually place the inserts into the mold one by one. Because operators are directly involved, they can carefully inspect, pack, and assemble the mold components, ensuring that each step meets the process requirements. Additionally, insertion by hand is relatively low-cost and is suitable for low-volume injection molding production or specific custom needs.
Step 2: Injecting Molten Plastic into the Mold
The second step in insert molding is to use an injection device to accurately inject molten plastic into the mold under high pressure. Under high pressure, the molten plastic quickly fills every corner and crevice of the mold, while also expelling any air, preventing bubbles or defects within the product.
Step 3: Opening the Mold and Removing the Molded Part
At this stage, after the molten plastic has uniformly filled the mold cavity, it is crucial to maintain the mold temperature within a preset range. This ensures that the plastic solidifies at the expected rate, preventing internal stress or defects caused by rapid temperature changes.
Once the plastic inside the mold has fully solidified and cooled to the appropriate temperature, the mold is opened and the operator removes the molded insert part.
Step 4: Separating the Molded Part from the Gate
After the molding process is complete, the molded part is usually tightly connected to the gate. For subsequent use and processing, this connection needs to be precisely severed.
To effectively separate the molded part from the gate, specialized tools and techniques are typically used. These tools include blades, scissors, hot cutters, and other similar devices.
Step 5: Fine Post-Processing
After the insert molded parts are formed, a series of post-processing steps are necessary to enhance their functionality and appearance. The following are common post-processing steps:
Deburring: Small edges or burrs that may form during the molding process can affect the appearance and functionality of the parts. Specialized deburring tools or manual deburring are used to remove these unwanted parts, ensuring the parts are smooth and refined.
Stress Relief: To eliminate any internal stresses that may have developed during the molding process, the parts need to undergo heat treatment. This treatment is typically carried out at a temperature slightly above the working temperature of the parts, such as 10 to 20 degrees Celsius higher, but not exceeding their deformation temperature.
Surface Finishing: Depending on the product’s design requirements and intended use, various surface finishing techniques can be chosen. These techniques include, but are not limited to, printing, polishing, and electroplating, aimed at enhancing the parts’ aesthetics, wear resistance, or other physical properties.
Humidity Balancing: To maintain dimensional stability and prevent oxidation, the molded parts are placed in hot water at 80 to 100 degrees Celsius to accelerate the moisture absorption process. This ensures the parts maintain good performance during storage and use.
Advantages of Insert Molding
The insert molding technique seamlessly combines the moldability, flexibility, and resilience of plastic with the rigidity, strength, and heat resistance of metal. It efficiently manufactures intricately designed metal-plastic integrated products, reducing weight, meeting functional requirements of electrical products, and enhancing product strength.
This technology opens up new possibilities in product design, eliminating the need for secondary processing, reducing assembly time and injection molding costs. Moreover, with a diverse range of insert materials, it’s applicable across various scenarios. Particularly when integrated with vertical injection molding machines, robotic arms, and similar equipment, it enables automated production, boosting product reliability and manufacturing efficiency.

Disadvantage of Insert Molding
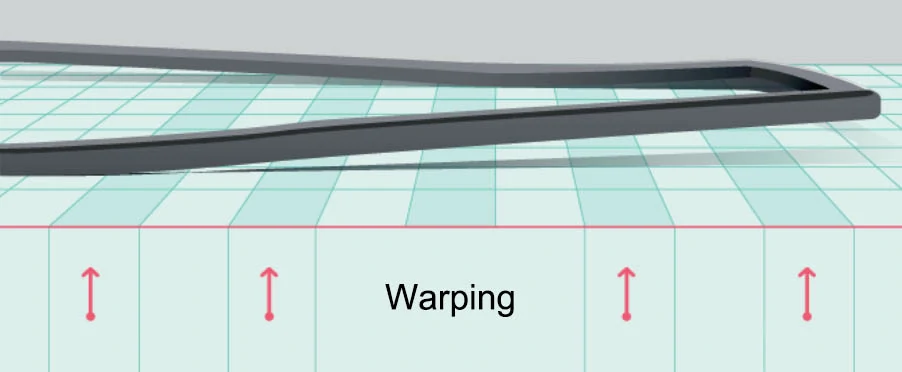
Although insert molding offers numerous advantages, it also presents some notable drawbacks. The introduction of inserts complicates the mold structure, increasing manufacturing costs and cycle times, thereby making automated production more challenging. Additionally, the inconsistency in thermal expansion coefficients between inserts and plastic may lead to internal stress within the product, resulting in product breakage or deformation, especially prominent when using threaded inserts. If defects occur during insert molding, such as inejection molding defects, missing inserts, or incorrect positioning, the entire product may need to be scrapped, resulting in significant losses.
Application of Insert Molding
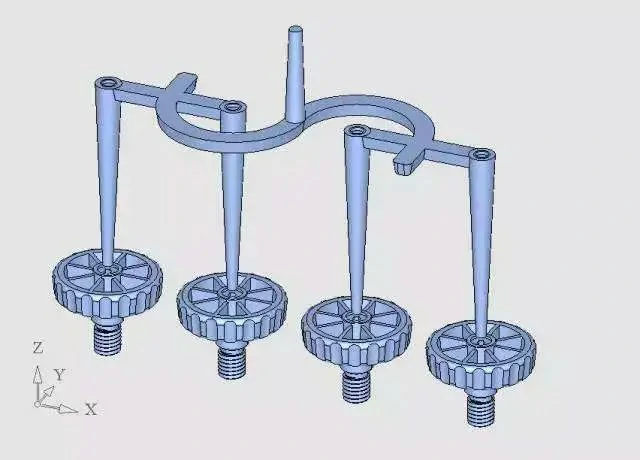
Insert molded parts find widespread applications across multiple industries. They serve as substitutes for metal parts in various applications, including threaded fasteners, gears, electrical sensors, digital control panels, appliance knobs, wires with rubber outer coverings, dental instruments, pipes, medical device components, prosthetics, medical casings, medical knobs, and surgical instruments, among others. These applications not only enhance product performance and durability but also reduce production costs and weight.

Design Guidelines for Insert Molding:
When designing for insert molding, it’s essential to consider the process characteristics and perform Design for Manufacturing (DFM):
1) Material Selection: Various materials such as copper, aluminum, steel, hard plastics, ceramics, glass, and plastics can be used as inserts. Among them, brass, being corrosion-resistant, easily machinable, and moderately priced, is commonly used.
2) Shape Consideration: Whenever possible, the shape of the insert should be circular or axially symmetric. Avoid sharp corners or angles to facilitate uniform shrinkage and prevent localized stress or stress concentration.
3) DFM of Inserts: Metal inserts are typically machined or stamped, so the shape of the insert must be conducive to these manufacturing processes.
4) Design for Placement: To facilitate placement and positioning within the mold, the protruding part of the insert (i.e., the part placed in the mold) should be designed as cylindrical, as molds can easily accommodate circular holes.
5) Integration with Bosses: When integrating inserts into bosses, to ensure stable bonding and strength of the plastic matrix, the inserts should extend to the bottom of the bosses (with minimum bottom thickness ensured), and the insert heads should be rounded.
What is the Difference Between Overmolding and Insert Molding?
The key difference between overmolding and insert molding lies in the process and the number of material shots used.
In overmolding, a pre-existing component or substrate is first placed into the mold. Then, a second shot of molten plastic or another material is injected over the substrate to encapsulate or bond with it. This results in a combined part where the overmolded material encapsulates or adheres to the original substrate.
In insert molding, a metal insert or other type of insert is first placed into the mold cavity. Then, a single shot of molten plastic is injected into the mold, filling the space around the insert. As the plastic cools and solidifies, it bonds with the insert to create a composite part.

So, in summary:
- Overmolding involves two shots of material: one to create the substrate and another to overmold the substrate.
- Insert molding involves a single shot of molten plastic that bonds with a pre-placed metal or other type of insert.
BOYI Insert Molding Capabilities
Whether you’re seeking insert molding services or feeling unsure about which manufacturing process to choose, BOYI is your trusted partner. With a team of professional engineers boasting rich experience and expertise, we can offer the best manufacturing process recommendations for your parts.
If you’re in need of customized solutions for insert molded parts, don’t hesitate to contact BOYI. We are committed to serving you and providing high-quality insert molded parts to meet all your needs.
Put your parts into production today
All uploads are secure and confidential.
FAQ
Best practices for insert molding include maintaining appropriate draft angles, consistent wall thicknesses, eliminating undercuts, and minimizing unnecessary part features and finishes. Adhering to these guidelines ensures efficient and reliable production.
In insert molding, commonly used materials for inserts include steel for durability, wear resistance, and high-temperature tolerance, especially tool steels like H13, P20, and S7. Aluminum is also a lightweight and economical choice for mold components.
Catalog: Injection Molding Guide

This article was written by engineers from the BOYI team. Fuquan Chen is a professional engineer and technical expert with 20 years of experience in rapid prototyping, mold manufacturing, and plastic injection molding.